Showing posts with label DECORATE. Show all posts

Wednesday, January 2, 2013

RED, WHITE & GREEN SILK FLORAL CENTERPIECE


Although my favorite time of year is Christmastime, it has to be one of my least favorite seasons weather-wise.  I hate, hate, hate cold weather.  So for the past few years between Christmas and New Years my husband and I head for Hilton Head for a week right after Christmas.  He plays golf and I do what I do best, which is shop.  Hey, we all know that is a sport!  Then at night we reconvene and visit friends. I love driving into their driveways with their front yards filled with palm trees and Christmas lights.  Now I'm not quite sure why I love palm trees so much, but I'm pretty sure it has something to do with warm weather and vacation, and it doesn't get any better then when they are decked out with lights for the holidays.

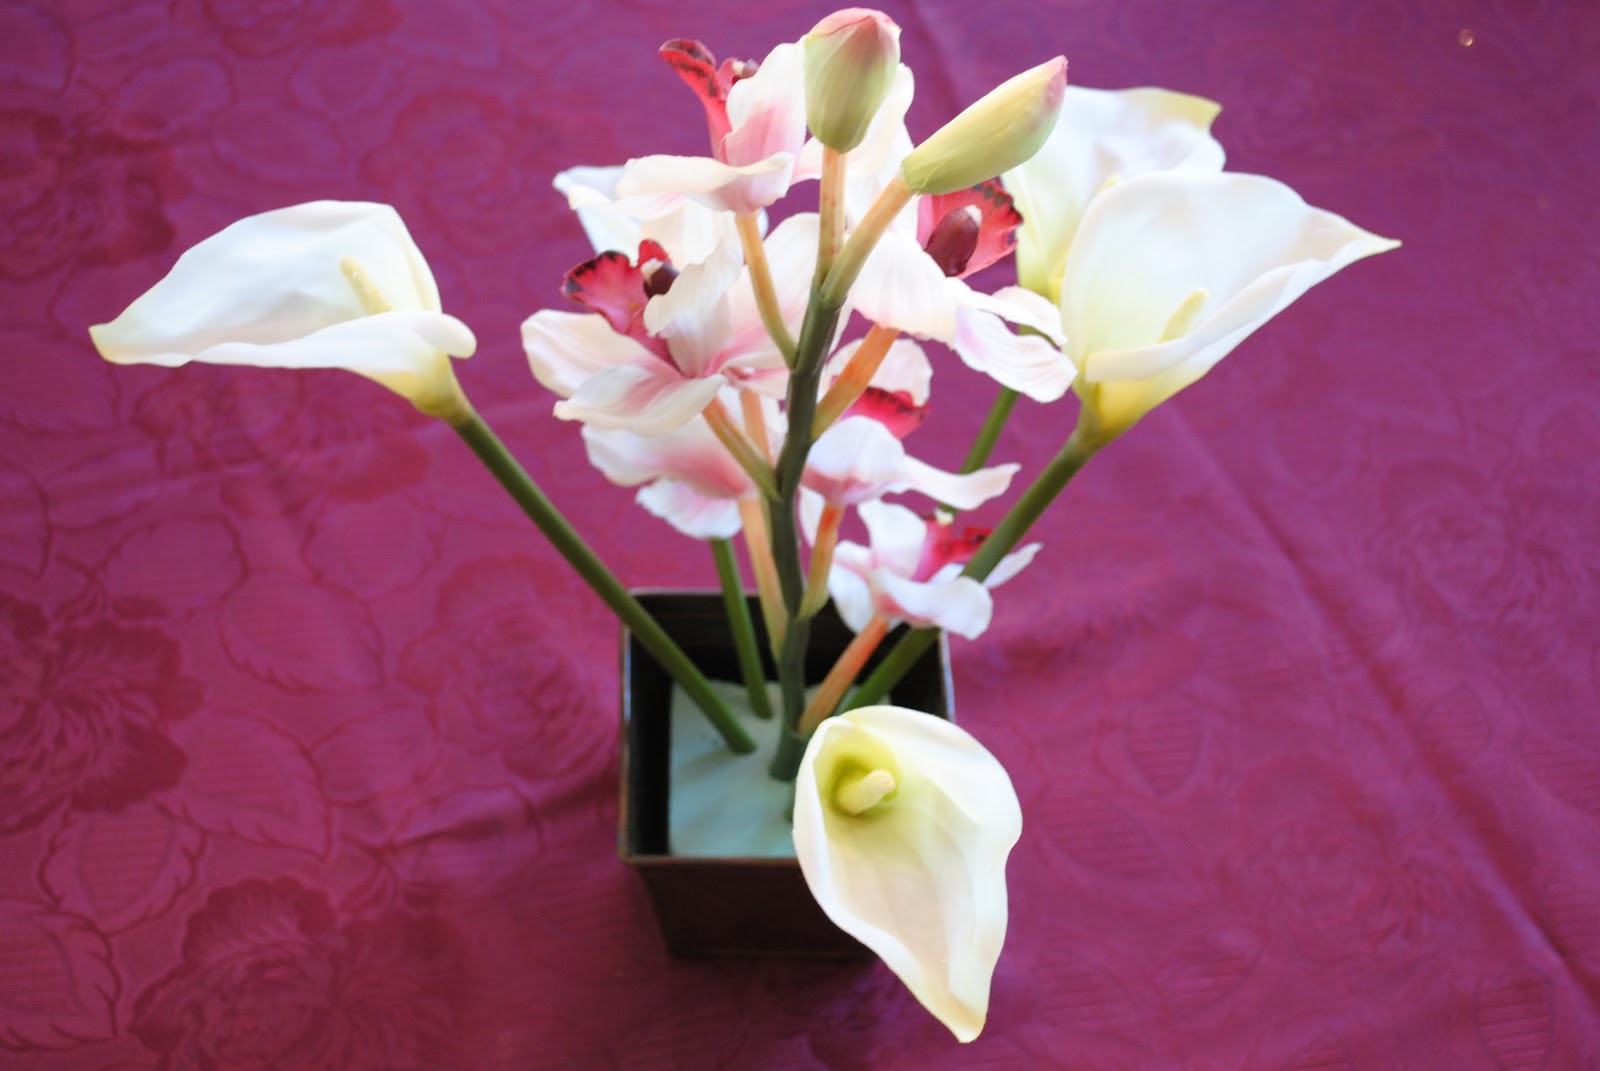
Upon returning home, the closest I could come to being reminded of my beloved subtropical holiday decor is by making a silk floral arrangement filled with some of my favorite reds, whites and greens that are indigenous to the tropics. So if you need a little warming up right now as I do, try making this simple but elegant centerpiece.

                                                             * MATERIALS

                                             Container/Vase (Pictured is 6" square)
                     Dry Foam (Sized to fit in bottom of container - Pictured is 4" square)

                                                     2 Vertical/Standing Orchids

                                                    3 Horizontal/Leaning Orchids

                                                                  5 Lilies
                        
                                                           3 Spiked Flowers
                                        
                                                            1 Bamboo Bush 

*I bought all the materials from Michael's.  If you are in no hurry to make this, Michael's has floral department sales about 3-4 times a year at 40-50% off.

INSTRUCTIONS:

STEP 1:  Secure dry foam in bottom of container/vase.  Measuring and cutting it to fit snugly into the container/vase is one way to secure it.  Since I am mathematically challenged, I used a piece of duct tape to secure mine.  Other ways to to secure it is with floral tape.


STEP 2:  Cut one vertical/standing orchid so that the top part is 18" tall. Insert into the middle of the dry foam.
                                                                View Front

STEP 3:  Cutting lily stems...
               Cut two stems so they are 10" long each, not including flower.
               Cut one stem so it is 9" long, not including flower.
               Cut one stem so it is 8" long, not including flower.
               Cut one stem so it is 6" long, not including flower.
               Insert one 10" stem to right or east of orchid at 2 o'clock.
               Insert one 10" stem in back or north of orchid at 11 o'clock.
               Insert 9" stem to left or west of orchid at 9 o'clock.
               Insert 8" stem  to southwest of orchid at 7 o'clock.
               Insert 6" stem in front or south of orchid at 5 o'clock.

                                                              View Top Front

                                                View Top Front (slightly lower angle)

                                                       View Front (lower angle)

                                                                  View Back

                                                         View Back (lower angle)

STEP 4:  Cutting stems of spiked flowers...
               Cut one stem so it is 9" long, not including flower.
               Cut one stem so it is 8" long, not including flower.
               Cut one stem so it is 7" long, not including flower.
               Insert 9" spike slightly behind center orchid at 11 o'clock.
               Insert 8" spike in front of orchid at 6 o'clock.
               Insert 7" spike behind orchid at 2 o'clock.

                                                            View Top Front

                                                   View Top Front (lower angle)

                                                              View Back

STEP 5:   Cut bamboo bush stems apart, leaving 1" stems each.
                Insert in spaces in between orchid, lilies and spiked flowers.

                                                                 View Front

                                                                 View Back

STEP 6:   Cut 2nd orchid in half  approximately 10" each.  Insert one piece directly behind the center 18" orchid.  Insert second piece below the first 10" piece at 5 o'clock at more of a horizontal angle.

                                                                View Back

STEP 7:   Cut the top part of the three horizontal/leaning orchids approximately 10-12" long.  
                (You will not need the bottom part of each orchid stem. I discarded mine.)
                Insert one top part in the back near the bottom of the arrangement at about 11 o'clock.
                Insert one on the left side near the bottom of the arrangement at about 8 o'clock.
                Insert one on the right side near the bottom of the arrangement at about 4 o'clock.
               
                                          View Front (Look at bottom left & right)

Yay!  Your arrangement is now complete.  Please remember this is an art not a science.  You may still need to tweak it to get it exactly the way you want it.  

PLEASE NOTE:  I have also translated this centerpiece into other colorful variations.  I used peach tones in the arrangement pictured below.  


                                                              MATERIALS

                                                    3 Vertical/Standing Orchids
                                                                 10 Lilies
                                                              1 Berry Bush
                                                            1 Bamboo Bush

INSTRUCTIONS:

STEP 1-3:  Same as above.
STEP 4:  Instead of using spiked flowers I used the additional 5 lilies.
STEP 5:  Same as Step 5 above but cut apart the berry bush also and insert as well.
STEP 6:  Cut the remaining two vertical/standing orchids into 3 even parts each.
               Insert the 6 pieces in the bottom section.

                                        ~ Have fun creating your own customized centerpiece ~
                                                                    ~ Debbie ~

Want more Christmas ideas?  Please click below...
Christmas by Debbie


Monday, December 24, 2012

KNEELING SANTA - A SWEET SWEET GIFT


I am unapologetic about my love for all things Christmas whether it be religious or secular.  But, like many people I find it very easy to get caught up in the commercial aspect of the season.  This precious little figurine of Santa humbly bowing before Baby Jesus is a gentle reminder for me of the true meaning of Christmas when it starts getting too hectic. 

This precious 4" figurine makes a sweet gift for yourself and/or someone on your list.  If you are interested in reading more about it or purchasing it, please click below...

Fontanini Santa Kneeling with Christ Child Figurine

                                                              ~ Debbie ~

Want more gift ideas?  Please click below...
Pineapples & Palm Trees

Friday, November 30, 2012

DRESS UP HOME FURNISHINGS AT CHRISTMAS


Incorporating Christmas decor within existing home furnishings adds an element of surprise to any room,  creating flair and interest to what is sometimes an otherwise hidden or overlooked space.  Placing glittery ornaments inside a sofa end table draws the eye to what is usually a humbly functional piece of furniture. 


Instead of using a tabletop to display festive ornaments, why not partially pull out one of its drawers and fill it to overflowing for a festive impact. 


Many homes have at least one decorator chest tucked into a corner of a room.  If you happen to have one of these popular accessories, open the lid and drape jeweled garland along its top and fill the bottom with colorful ornaments. 

There are so many unique and clever ways to dress up a room using its furnishings.  All you have to do to start is walk from room to room in your home with freshly opened eyes.  You'll surprise yourself with all you have to work with that is just waiting to be dressed up! 

                                                                   ~ Debbie ~

Want more decorating ideas?  Please click below...
Pineapples & Palm Trees

Wednesday, November 14, 2012

TEARDROP GARLAND


Teardrop garland  is "V" shaped and can be used as wreaths as well as for other holiday decor.  The best part is it can be embellished to fit any decorating style in just a few easy steps.  One of my favorite things to do with it is to dress up the back of chairs at Christmas.


Teardrop garland comes in as many sizes as there are creative ways to use it.  Michaels sells a variety of lengths.  The length of the garland pictured above is 14" not including the stem.  

                                                             MATERIALS 


                                                         Teardrop Garland
                                                             Bow/*Ribbon
                                                            **Pine Cones
                                                                 Scissors
                                                              Floral Wire

*If you are not buying a ready made bow and need instructions on making a bow please click below...

How To Make A Bow

**I used pine cones for ornamentation but Christmas ornaments work well also.

INSTRUCTIONS:

STEP 1:  Attach the wire on the back side of the bow to the top of the teardrop garland.  The stem on the garland pictured came shaped into a hanger for easy hanging.  Some teardrop garland has a straight stem.  Either stem shape will work.


STEP 2:  Attach wire to base of pine cones.  If base doesn't have a stem, attach wire around bottom scales of pine cone.
  

 STEP 3:  Attach pine cones by their wires to a sprig/sprigs of garland underneath bow.


STEP 4:  To attach teardrop garland to chair, bend stem into a loop like the top of a hanger.


 To protect your chair from scratches, wrap ribbon around the hanger part of the stem .


Hang the hanger part of the stem over the back of the chair top.

                                                               
                                                                ~ Debbie ~

Want more decorating ideas?  Please click below...
Pineapples & Palm Trees

Thursday, November 8, 2012

HOW TO MAKE A BOW


Bows add fun and festivity to everything.  You can attach them to wreaths, garland, chair backs, sconces as well as endless other possibilities.  They are easy and inexpensive to makeThe instructions below look long and laborious but there really are just a few steps that are repeated over and over again to create a beautiful full bow!

                                                               MATERIALS

                                                            *5 yards Ribbon
                                                                Floral Wire 
                                                                   Scissors
                                                             Tape Measure


*Fabric and craft stores sell a large variety of ribbon.  Costco sells a nice selection at Christmas as well.  If you like convenience, Amazon also has a great selection.  Please click below if you would like to see what they offer...

Christmas Ribbon

                                                             INSTRUCTIONS

STEP 1:   Roll one end of the ribbon around your thumb.  The roll will be about 1 1/2" round.  You will continue to hold the roll securely in place with your thumb as you make your bow.  This roll will be the center of your bow... 


Position ribbon to look like photo below.  This will be the front of the bow...


Photo below is the back of the bow...


STEP 2:  With the front of the bow facing you, twist ribbon in back of the center roll...


The back of the bow will now look like photo below...


The front of the bow will now look like this...


Loop ribbon (2 1/4") to the left side of the center roll which you are holding securely with your thumb so that it looks like photo below...


With the front of the bow facing you twist ribbon in back of the bow...


The back of the bow will now look like this... 


The front of the bow will now look like this...


Loop ribbon (2 1/4") on right side of the center roll you are still holding securely with your thumb so that it looks like photo below...


STEP 3:  With the front of the bow facing you, twist ribbon in back of the center roll...


The back of the bow will now look like photo below...


The front of the bow will now look like this...


Loop ribbon (1 1/4" longer than first loop) to the left side of the center roll which you are holding securely with your thumb so that it looks like photo below...


With the front of the bow facing you twist ribbon in back of the center roll...


The back of the bow will now look like photo below...


 The front of the bow will now look like this...


Loop ribbon (1 1/4" longer than first loop) on right side of the center roll you are still holding securely with your thumb so that it looks like photo below...


You have now made two loops on each side of the center roll.  A large full bow requires five loops on each side.  Repeat the steps above until you have made five on each side.


Once you have made five loops on each side bring excess ribbon straight down vertically from behind center roll.  Cut vertical ribbon to desired length...


Cut a second piece of ribbon about the same length as the vertical ribbon in the photo above and set aside for now...


STEP 4:  Cut and thread floral wire (12-18" depending on width of ribbon) through the center roll...


Pull the floral wire to the back of the bow and twist tightly behind the center roll so that the loops of ribbon are pulled tautly together to secure them in place...


STEP 5:  Taking the second piece of ribbon you cut to hang vertically, place it behind the center roll on top of existing twisted wire and secure the second ribbon in place tightly to secure... 


Front of the bow will now look like photo below...


STEP 6:   To fluff out the bow loops - start on left side of the center roll - With you left hand grab the first loop nearest the center roll and with your right hand grab the second loop.  With your left hand pull the first loop upward and with your right hand pull the second loop downward simultaneously... 


Do the same with the third and fourth loops.  With your left hand grab the third loop and with your right hand grab the fourth loop.  With your left hand pull the third loop upward and with your right hand pull the fourth loop downward simultaneously...  


Then holding the four loops in place with your left hand take the fifth loop with your right hand and pull downward..


Repeat the same process on right side of the bow...


                                          YAY!!!  You have completed your bow!!! 


                                                                ~ Debbie ~
                                                                 
Want more decorating ideas?  Please click below...
Pineapples & Palm Trees