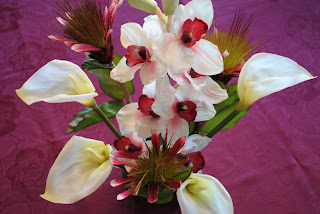
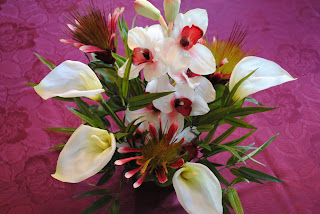
Although my favorite time of year is Christmastime, it has to be one of my least favorite seasons weather-wise. I hate, hate, hate cold weather. So for the past few years between Christmas and New Years my husband and I head for Hilton Head for a week right after Christmas. He plays golf and I do what I do best, which is shop. Hey, we all know that is a sport! Then at night we reconvene and visit friends. I love driving into their driveways with their front yards filled with palm trees and Christmas lights. Now I'm not quite sure why I love palm trees so much, but I'm pretty sure it has something to do with warm weather and vacation, and it doesn't get any better then when they are decked out with lights for the holidays.
Upon returning home, the closest I could come to being reminded of my beloved subtropical holiday decor is by making a silk floral arrangement filled with some of my favorite reds, whites and greens that are indigenous to the tropics. So if you need a little warming up right now as I do, try making this simple but elegant centerpiece.
* MATERIALS
Container/Vase (Pictured is 6" square)
Dry Foam (Sized to fit in bottom of container - Pictured is 4" square)
2 Vertical/Standing Orchids
3 Horizontal/Leaning Orchids
5 Lilies
3 Spiked Flowers
1 Bamboo Bush
*I bought all the materials from Michael's. If you are in no hurry to make this, Michael's has floral department sales about 3-4 times a year at 40-50% off.
INSTRUCTIONS:
STEP 1: Secure dry foam in bottom of container/vase. Measuring and cutting it to fit snugly into the container/vase is one way to secure it. Since I am mathematically challenged, I used a piece of duct tape to secure mine. Other ways to to secure it is with floral tape.
STEP 2: Cut one vertical/standing orchid so that the top part is 18" tall. Insert into the middle of the dry foam.
View Front
STEP 3: Cutting lily stems...
Cut two stems so they are 10" long each, not including flower.
Cut one stem so it is 9" long, not including flower.
Cut one stem so it is 8" long, not including flower.
Cut one stem so it is 6" long, not including flower.
Insert one 10" stem to right or east of orchid at 2 o'clock.
Insert one 10" stem in back or north of orchid at 11 o'clock.
Insert 9" stem to left or west of orchid at 9 o'clock.
Insert 8" stem to southwest of orchid at 7 o'clock.
Insert 6" stem in front or south of orchid at 5 o'clock.
View Top Front
View Top Front (slightly lower angle)
View Front (lower angle)
View Back
View Back (lower angle)
STEP 4: Cutting stems of spiked flowers...
Cut one stem so it is 9" long, not including flower.
Cut one stem so it is 8" long, not including flower.
Cut one stem so it is 7" long, not including flower.
Insert 9" spike slightly behind center orchid at 11 o'clock.
Insert 8" spike in front of orchid at 6 o'clock.
Insert 7" spike behind orchid at 2 o'clock.
View Top Front
View Top Front (lower angle)
View Back
STEP 5: Cut bamboo bush stems apart, leaving 1" stems each.
Insert in spaces in between orchid, lilies and spiked flowers.
View Front
View Back
STEP 6: Cut 2nd orchid in half approximately 10" each. Insert one piece directly behind the center 18" orchid. Insert second piece below the first 10" piece at 5 o'clock at more of a horizontal angle.
View Back
STEP 7: Cut the top part of the three horizontal/leaning orchids approximately 10-12" long.
(You will not need the bottom part of each orchid stem. I discarded mine.)
Insert one top part in the back near the bottom of the arrangement at about 11 o'clock.
Insert one on the left side near the bottom of the arrangement at about 8 o'clock.
Insert one on the right side near the bottom of the arrangement at about 4 o'clock.
Yay! Your arrangement is now complete. Please remember this is an art not a science. You may still need to tweak it to get it exactly the way you want it.
PLEASE NOTE: I have also translated this centerpiece into other colorful variations. I used peach tones in the arrangement pictured below.
MATERIALS
3 Vertical/Standing Orchids
10 Lilies
1 Berry Bush
1 Bamboo Bush
STEP 1-3: Same as above.
STEP 4: Instead of using spiked flowers I used the additional 5 lilies.
STEP 5: Same as Step 5 above but cut apart the berry bush also and insert as well.
STEP 6: Cut the remaining two vertical/standing orchids into 3 even parts each.
Insert the 6 pieces in the bottom section.
~ Have fun creating your own customized centerpiece ~
~ Debbie ~
Want more Christmas ideas? Please click below...
Christmas by Debbie


