Monday, July 23, 2012

BEEF STROGANOFF


If you are looking for a deliciously easy meal on a cold winter day, this classic beef stroganoff recipe is for you.  Hearty and rich, flavored with sour cream and cream cheese, the sauted mushrooms and tender beef cubes melt in your mouth.  This is my favorite kind of  "no fuss" meal. I can simmer it in the crock pot all afternoon while I go about my Christmas preparations. The best part is I usually make a double batch and freeze the leftovers to pull out at a later date for impromptu football games, unexpected guests and mostly other busy days! 

                                                            INGREDIENTS


                                                3 pounds Pot Roast cut meat

         2 cans (10.75 ounce) Golden Mushroom Soup (DO NOT USE CREAM OF MUSHROOM!)

                                           2 tablespoons Worcestershire Sauce

                                              4 cloves Garlic (finely chopped)

                                                          1/2 cup Water

                                                     1 Beef Bouillon Cube

                                       1 medium Red Onion (finely chopped)

                                     3 cups Portobello Mushrooms (chopped)

                                                   3 ounce Cream Cheese

                                                     1/3 cup Sour Cream

                                      1/2 teaspoon Garlic Powder (or to taste)

                                               1 teaspoon Salt (or to taste)

                                           1/2 teaspoon Pepper (or to taste)

                                                          Egg Noodles

DIRECTIONS:

Step 1:  Cook beef at 350 degrees until brown on the outside but pink in the middle (approximately 45 minutes).  This allows some fat to cook off the meat making the meat leaner but still juicy.

Step 2:  In crock pot, add soup, worcestershire sauce, chopped garlic, water, bouillon cube, red onion, garlic powder, salt and pepper.  Stir together and then add beef (cubed) ensuring it is covered by liquid.  Cook on high for 6 hours.  Add more water if necessary over time. 


Step 3:  A half hour before serving, saute mushrooms and add to crock pot.


Step 4:  About 15 minutes before serving, cook egg noodles in separate pan in boiling water on stove.

Step 5:  While egg noodles are still cooking and ten minutes before serving, add cream cheese and sour cream to crock pot mixture, mixing thoroughly.


Step 6:  Serve beef stroganoff over strained egg noodles.  If you prefer rice to egg noodles, it is just as yummy over rice.
                                                                        
Want more recipe ideas?  Click below.
Pineapples & Palm Trees
                                                             ~ Debbie                                                                 

Wednesday, July 11, 2012

POINSETTIA CREAM CHEESE APPETIZER


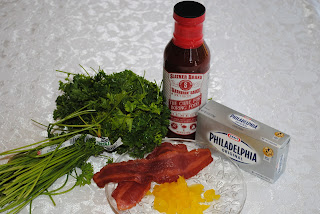
If it does your heart good to watch people lick a platter clean then this appetizer is for you!  My friend, Ann, came knocking at my door recently with a bottle of "Slatherin' Sauce" along with an appetizer recipe that she had taste tested as a promotion at The Fresh Market grocer.  Sweet and mildly spicy, it's incredibly simple to make consisting of cream cheese, bacon and a bottle of "Slatherin' Sauce" (see Slather Brand Foods link below where to buy it).  Ann said that as soon as she tasted how delicious it was she thought of "Christmas by Debbie".  Before I posted it I decided to make it and take it to a party.  She was right!  It got devoured! 

When I emailed her the rave reviews it got along with a picture of it shaped into a Poinsettia, she replied, " I would never think of making flower petals out of a brick of cream cheese!"  Maybe not, but thank you, Ann, for thinking of me!!!

                                                            INGREDIENTS


                     1 - 8 oz. Cream Cheese  (I used 5 - 8 oz. for pictured "poinsettia")
                             2 slices Bacon  (Need 10 slices for pictured "poinsettia")
             1 bottle Original Slatherin' Sauce  (2-3 bottles needed for pictured "poinsettia")
                        
                                                    Optional Embellishments

                                                                 Parsley
                                                            Yellow Pepper

Click below to find where you can buy "Original Slatherin' Sauce.
Original Slatherin' Sauce

NOTE:  The pictured "poinsettia" served about 30 people at the party I mentioned.  There were a wide variety of other appetizers offered as well.

INSTRUCTIONS TO MAKE  POINSETTIA SHAPED APPETIZER:

STEP 1:  Make a paper template shaped to resemble a poinsettia leaf making sure it is small enough to fit on the brick of cream cheese but large enough to cover as much of it as possible.


STEP 2:  Place the template on top of the unwrapped brick of cream cheese and using a sharp knife cut the leaf pattern out of the cream cheese.  Do the same for all 5 bricks of cream cheese. 

STEP 3:  Place the 5 bricks of cream cheese on an oven friendly serving plate evenly apart so that it resembles a poinsettia.  Place crumbled cooked bacon on top of cream cheese leaves.


STEP 4:  Pour "Original Slatherin' Sauce" over all 5 cream cheese leaves.

STEP 5:  Heat for 15-20 minutes at 350 degrees.  Then remove from oven.

STEP 6:  Add diced yellow pepper in the center of the poinsettia where the 5 leaf tips are touching one another.  Place parsley in between cream cheese leaves as pictured.


STEP 7:  Serve warm with crackers or toasted baguettes.

NOTE:  If you are serving far fewer people than 30, you may want to forego the poinsettia shape and serve 1 brick of cream cheese for every 6 people as long as you offer a variety of other appetizers as well!!!

Want more recipe ideas?  Click below.Pineapples and Palm Trees

                                                             ~ Debbie ~

Monday, July 9, 2012

GLASS PAINTING - CREATIVE GIFT GIVING


Glass painting is a perfect way to personalize a gift.   Besides being a thoughtful gift to give, it is fun and inexpensive to make.  It could be something as simple as the receiver's name,  favorite sport, hobby or interest.    And it's not just a project for adults, older kids will have fun creating these gifts as well for family, friends and teachers.  So fire up that imagination and go wild!  

P.S. If you top it off with a homemade goody wrapped in festive cellophane,  even better! 


                                                         MATERIALS NEEDED

                                                  
                                                                     Plate
                                         Glass Paint (Michael's has a nice selection)
                                                                Paintbrush
                                                                    Paper
                                                                    Pencil
                                                             *Grease Pencil


*NOTE:  I had to buy my grease pencil through Amazon.  I could not find it locally.  I checked Michael's and Staples and neither carry grease pencils anymore.  I've included the Amazon link below if you would like to check it out... 

Dixon Phano China Marker Pencils, Black, 2 Pencils per Pack (30771)

INSTRUCTIONS:

STEP 1:  Unless you prefer to draw your design free hand on the back of plate, you can create a template with pencil and paper.  Cut paper to the size and shape of the plate you will be painting on.  Then draw your design on the paper.  I've included 2 designs (Holly & Santa) to give you a couple of different ideas.


STEP 2:  Place completed drawing underneath plate so that it clearly shows through when looking at front of plate. 


STEP 3:  Using grease pencil, trace template design onto front of plate. 

                                    I added additional holly leaves to corners of plate.


STEP 4:  When finished tracing, turn plate onto back side and paint design.


PLEASE NOTE:   Glass paint is not meant for surfaces that touch food or drink which is why the design is painted on the under side of the plate.  

STEP 5:  Once paint is dry, wash grease pencil marking off of front of plate.


                                                                  Enjoy
                                                              ~ Debbie ~

Want more creative ideas?  Please click below...

Pineapples & Palm Trees